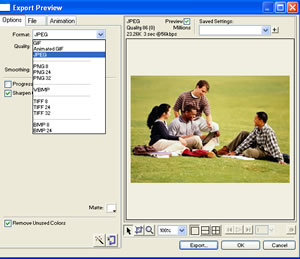
Digital Portfolios: Step Three
Fireworks: The Basics (continued)

|| A. Get Acquainted with Fireworks || B. Modify a Picture || C. Save as PNG; Export as JPG ||
|| D. Make a Background || E. Save as PNG; Export as GIF ||

C. Save as PNG; Export as JPG

THREE MAIN WEB GRAPHIC FORMATS

There are three main graphics formats (with different extensions) that can be viewed in a Web browser:

  1. GIF (Graphic Interchange Format): can be viewed in all browsers
  2. JPG (Joint Photographic Experts Group): can be viewed in all browsers
  3. PNG (Portable Network Graphics): can be viewed in some browsers

Best practice is to use only GIF and JPG.


"FIREWORKS PNG"

Here is a confusing point. The native working format for Fireworks is PNG. But it is not the same PNG as you would distribute on the Web.

Let's call it "Fireworks PNG."

Never use "Fireworks PNG" on the Web. Even if some browsers might be able to display it, it will be so huge as to be virtually useless.

When creating/editing graphics in Fireworks:

  • Save your working files as PNG
  • Export your Web graphic as JPG or GIF


JPG vs GIF

Does it really matter whether you use GIF or JPEG?

Yes!

GIF

can display a maximum of 256 colors

  • use for logos, cartoon-like images, or graphics with a few colors
  • not NOT use for most photographs
JPEG (JPG)

can display 16 million colors

  • use for most color photographs


Figure 3C-1


Figure 3C-2


Figure 3C-3


Figure 3C-4

SAVE AS "FIREWORKS PNG"

The native working format for Fireworks is Fireworks PNG. Every image you create or edit will be opened in that format. But you cannot publish that format to the Web

Best Practice is:

  1. Save your working files in PNG
  2. Export your image from PNG to JPG or GIF

To Save as (Fireworks) PNG:

  • Click on (top) Toolbar File-->Save As
  • Navigate to the folder where you want to store your working image files.
TO EXPORT AS JPG

To Export as JPG:

  • make certain you have the PNG image open
  • Click on (Top) Toolbar File -->Export Preview

You will get the Export Preview Dialog Box.

  • in the Format box, click on JPEG
  • click on EXPORT and save the file on your computer

Notice the Quality input just below the Format (Figure 3C-3). The default is typically 86. You can alter this number and give the image a higher quality (up to 100) or a lower quality (down to 0).

Notice as you change the Quality number, the preview window shows what the image would look like at that setting.

The higher the quality (to 100), the larger the file and the longer it will take the user to download the image.

The lower the quality (to 0), the smaller the file and the quicker it will take the user to download the image.

86 is typically a good balance of quality and size.

As you change these numbers, Dreamweaver will tell how long it would take the image to download with a certain setting.

In the example to the left (Figure 3C-4), the image is set at 86 quality. The file is 23.26 K and should take the user an average of 3 seconds to download with a 56K Modem.


NAMING YOUR FILES

When naming a file or an image, NEVER include spaces in your name.

UNIX (where you upload files to be distributed on the WWW) does not recognize the space as a character.

Files with spaces in them will not work on the WWW.


Step Two Continued: D. Make a Background-->


© 2003 McDaniel College
Department of Instructional Technology
SAK 1/05/03