Procedure:
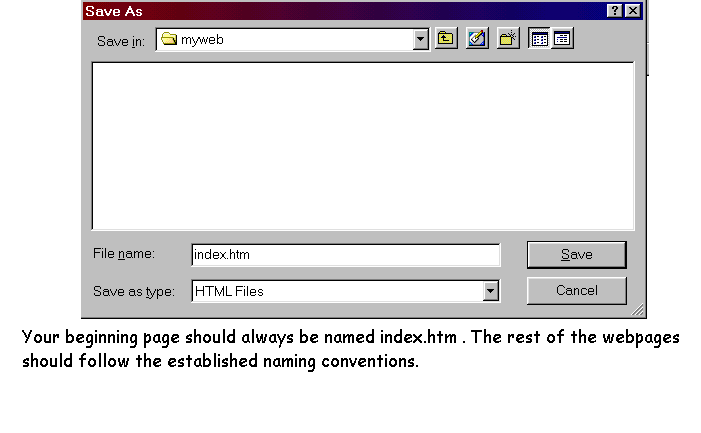
1. Prepare a folder to use for your website. All your webpages and graphics should be placed within this folder to avoid confusion. You may create other folders to out inside this one, being organized and consistent will save a lot of headaches later as you update your webpages. Usually, I have a separate folder for each topic in which I have a page(s). Then, as I revise my site, I can either upload or download an entire folder, rather than trying to keep track of which graphics go with which website. I also have a separate folder for graphics which are used throughout my site. I usually name that folder images. Your main webpage should be located in the root of your webfolder, and you will name it index.htm.
2. Open Netscape Communicator. A blank page will appear and will serve as your first document. Most icons should look familiar from other applications you have used. I have labeled other useful tools for web construction. Review the tools on the toolbar:

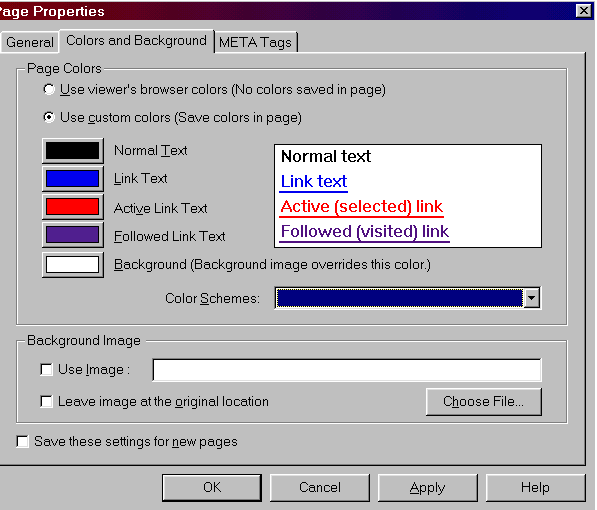
3. The first task will be to choose the settings for the webpage. Go to Format/Page Colors and Properties. Choose colors that will be easily viewed, and that will not interfere with your background. Plan colors to compliment each other. Link colors should contrast with background color or picture. There are some pre-set color sets that you may also use. If you want to use a background from the Internet, first locate the image from the Internet, then you can right click on the image, save it to your appropriate folder, and rename it if you choose. (see file naming conventions) For additional tips on using graphics, see "Cut and Paste Graphics Tip Sheet"

Adding Text
4. First, if you like, you can format the text used in your document by selecting Format from the menubar and making your font choices. Simple fonts work best. The addition of text works in much the same way as in a word processing document. I recommend keeping the font size at the standard 12 point for the majority of your text. Remember that users can set their own font size on their computers, so if you make your font size large, and the user has their settings at large, your webpage could have HUGE text! You can also set the alignment to be left, center, or right. You can also change the color and style of the text.
Adding Graphics
5. Click on the Image icon from the toolbar, then click Choose File and locate the folder where the graphic has been saved (remember- it should be in your web folder!) You may want to set the text alignment and wrapping settings, spaces around the graphic, etc., until the graphic looks the way you want it to look. I usually set the text alignment and wrapping to tight (the last 2 settings on the right). If you want to edit these settings, right click on the graphic and select "Image Properties". You will not see many of these settings take effect until you preview the page in the browser. Once on the page, use the alignment tools to left, center or right align the object. You can further adjust the size of the graphic by clicking on it, then dragging the boxes to create the size you want. Graphics should be kept small - no larger than 50k, smaller is better. Usually the smaller graphics you get from the Internet are already sized appropriately for the web. Graphic files must be included when you upload.

Making Links
6. When readers click a link
to a web page, they jump to the destination specified by the URL. You don't
need to type a URL - when you link to websites in Composer, you can first
go to the page in your browser, then highlight and copy the URL, then click
back to the Composer page and then paste it.
To make a text link, type
in the text in the document. Then highlight the text, go to Link
OR Right click the text and select
Create
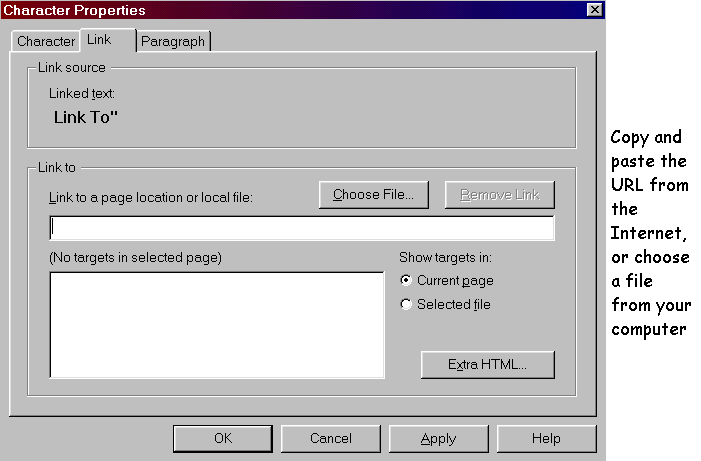
New Link Using Selected . Paste in the URL you copied. If the
link is to another htm page in your folder, click Choose File and
browse to the web page in your web folder. Click OK when done.

7. To make a graphic link, select the graphic by right clicking on it and follow the above directions.
Tables
| This is an example of a table .... | with 1 row and 2 columns. |
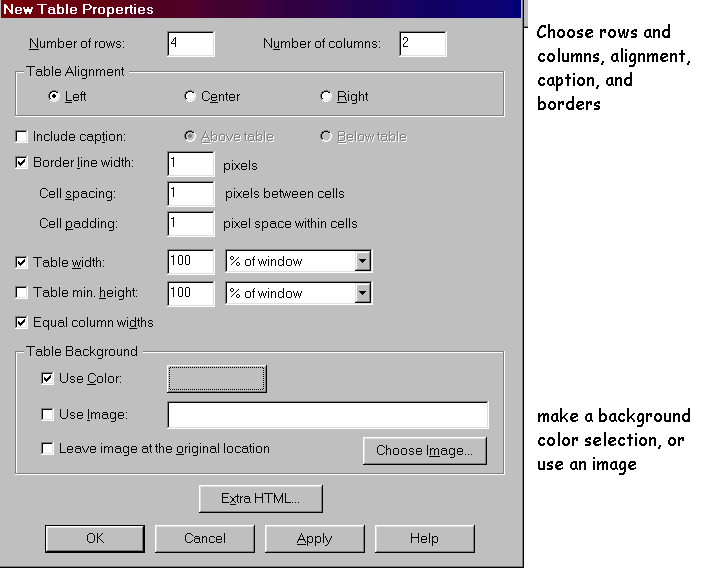
8. To add a table, click on the table icon in the toolbar and make your choices. Tables are a great place to add links. If you want an invisible table, use 0 cell spacing. You can also add graphics into the cells. You can have different colored backgrounds in each cell, or add a graphic to the background. Right click the table and select Table Properties to edit the entire table, a row, or a cell.

9. The lines above and below are added simply by clicking on the H. Line icon in the toolbar.
10. Save work frequently!

Preview
11. After saving your page,
click on Preview in the toolbar and your webpage will load using Netscape
Communicator.
You're done!
12. Congratulations on completing
all of the steps to making a simple webpage.
When naming files and folders,
note the following:
· Be sure to follow
the file-naming conventions of the Web server's platform. To be safe, use
only the characters A to Z, a to z, 0 to 9, - (hyphen), and _ (underscore).
Don't use accented characters, spaces, colons, question marks, slashes,
or backslashes. Filenames should not exceed eight characters, not including
the three-character filename extension.) examples: flight.htm for a start
page on flight ... plane.jpg for a graphic in jpeg format
· Use the appropriate
extensions for filenames (for example, .gif or .pdf) even if you are working
in Mac OS. Other operating systems use the extensions to recognize the
file type.