| 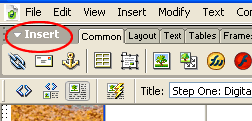
Figure 1A-E
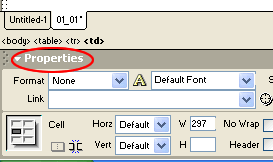
Figure 1A-F

Figure 1A-G

Figure 1A-H
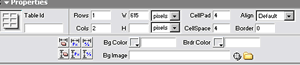
Figure 1A-I
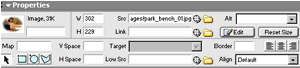
Figure 1A-J
|
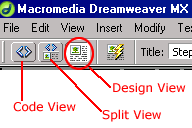
- Insert
Inspector (Figure
1A-E)
- Properties
Inspector
(Figure
1A-F)
DW
calls these toolbars "inspectors."
The
default workspace setup places:
-
the Insert Inspector at the top of the workspace
-
the Properties inspector at the bottom of the
workspace
Spend
a few minutes exploring these two features. They will be the tools
you use most, whether you are a beginner or an advanced user.
The
Insert Inspector allows you to inspect and, well, insert
"objects" on your page. Click on an icon, and Dreamweaver
provides the appropriate tool(s).
The
Insert Inspector has 12 tabs. You can click around and look at the
features, but here at the beginning, we will only use a few icons
on the COMMON tab (Figure
1A-G).
Don't worry about the rest for now.
Keep
the Common Tab selected on the Insert Properties.
Then, for example, to add an image to the page, simply click on
the image icon. To add a table, click on the table icon.
Note:
If the icon meanings are not obvious to you, hover the mouse cursor
over the icon, and DW will tell you what it is.
The
Properties Inspector allows you to inspect
and alter the properties of items on the
page (text, tables, images, etc.)
Properties
Inspector is the tool you will use most often, providing the majority
of formatting and layout features.
The
Properties Inspector is contextual. It changes
features--depending on what you have selected in the window.
- The
default interface is for text (Figure
1A-H)
- If
a table is selected, you will get a different set of tools (Figure
1A-I)
- If
an image is selected, you will get yet another set of tools (Figure
1A-J)
By
selecting (or highlighting) the objects on the page, then clicking
on the appropriate PROPERTIES INSPECTOR ICON, you can:
-
right, center, or left align
-
change fonts and font color
-
make text bold and italicize
- number,
button, and indent
- make
hyperlinks (See Step Two)
|