HOW TO CREATE AN ONLINE PORTFOLIO: PART 3
Add Pages and Hyperlinks
At the end of this lesson, participants will be able to:
-
add additional pages with different layouts
-
hyperlink to pages within the site and outside of the site
Specifically, this tutorial will get started the first two main Web pages: "Development Notes" and "Benchmark Portfolio Critique."
This set of instructions follows from:
1. Open ![]() Mozilla and then open Composer.
Mozilla and then open Composer.
Click on (toolbar) File --> New --> Composer Page
or, click on the Composer Iconat the bottom left of the browser window.
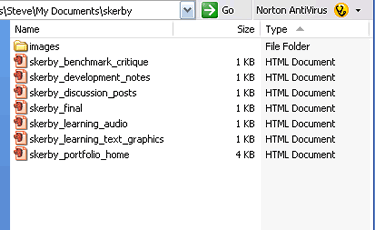
2. Make 6 Additional Pages for the Portfolio.
(Toolbar) File --> Save As
In the Page Title Input box, enter "Development Notes for OTL 502 "
Click OK
In the Save Page As dialogue box, enter username_development_notes
Click Save.
Open a New Page: (Toolbar) File --> Save As
In the Page Title Input box, enter "Benchmark Critique"
Click OK
In the Save Page As dialogue box, enter username_benchmark_critique . Click Save.
Do the same for:
- Title--"Discussion Posts"
- File name--username_discussion_posts
- Title--"Learning Activity: Text and Graphics"
- File name--username_learning_text_graphics
- Title--"Learning Activity: Audio"
- File name: username_learning_audio
- Title--"Learning Activity: Final"
- File name: username_final

If you were to open your folder (and your View was set on details) you would see something like the following:
2. Make Hyperlinks
Open (in Composer) your portfolio home page.
Highlight with your cursor the text "Benchmark Critique"
Click on
the link icon. Click on the Choose File button. The Open HTML File box should automatically go to your current folder; if it doesn't, navigate to your current folder and select username_benchmark_critique
Click Open. Click OK.
With the text "Learning Activity #1, link to username_learning_text_graphics
With the text "Learning Activity #2, link to username_learning_audio
With the text "Learning Activity #3, link to username_final
With the text "Discussion Forum Selection" , link to username_discussion_posts
With the text "Development Notes," link to username_development_notes
3. Get Background Image for Interior Pages
We want to get a background image to add to our images directory. So, click on this link to open a page with a notebook paper background (This should open a new window)
Right click anywhere on the page and select "Save Background Image As"
Note: In some browsers, you may need to select "view image" Then, on the page with the image, select "save image as"
Navigate to your images subfolder in your portfolio folder and save the image "notebook_paper.gif" in the images directory
4. Format Interior Pages: Add Background (Optional)
Open (in Composer) any page
Click on (Toolbar) Format --> Page Colors and Background
In the Page Colors and Background box, click on the Choose File button just below the Backgournd Image input box.
Navigate to your images directory and select "notebook_paper".
Click on Open. Click OK.
5. Add a Table for Title and Text: Benchmark Critique Page
Open (in Composer) username_benchmark_critique
To set the table off a bit from the left margin, put your cursor at the top left of the composer page, then click on
the indent icon
Click on (Toolbar) Insert --> Table
In Rows, enter 2; In columns, enter 1; in Width enter 700 pixels. In Border enter 0
6. Add Another Table for Title and Text
With your cursor directly under the table with two rows, add another table
In Rows, enter 5. In columns, enter 2. In Width enter 700 pixels. In Border, enter 0.
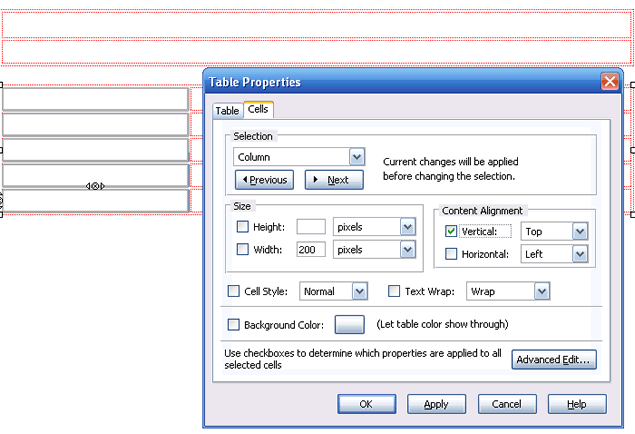
7. Edit a Table: Set Column Width
With your cursor in one of the cells in the left column of the bottom table, right click:
- select Table Cell Properties
- click on arrow in the Selection box
- select Column
- check the Width Box and enter 200 pixels Click OK
8. Edit a Table: Top Align Text
In order for the text to show up always at the top of the cell, we need to edit the text positioning in a cell
With your cursor, highlight the five smaller cells in the left column, right click, and select Table Cell Properties
In the Content Alignment box, click on Vertical and make certain Top is selected
******************************************
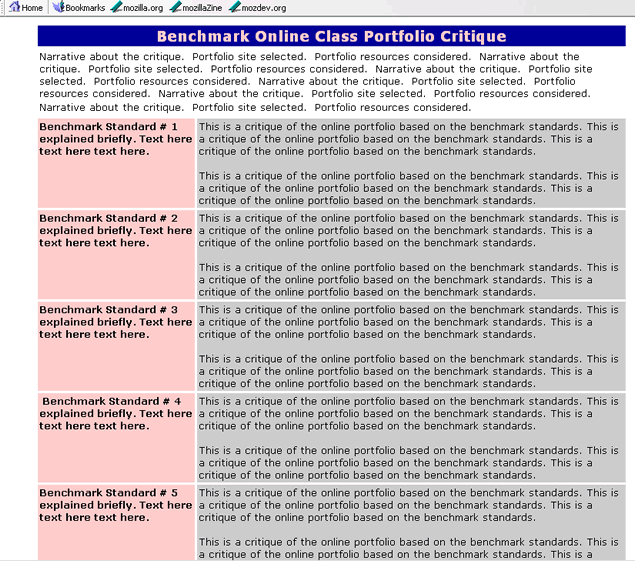
From here on out, you can use this basic table page design for your Benchmark Critique assignment, or set up a page layout of your own.
The point here was to get all pages created and to get started on a layout for the Benchmark Critique.
The suggestion is to put the title of the page in the top row of the first table, include a short narrative about your benchmark critique in the second row of the top table, then put the standards (or best practices, etc.) in the left column of the second table and the critiques in the right set of columns.
By doing a little color formatting and putting in some placeholder text, the page might look something like this.