
HOW TO CREATE AN ONLINE PORTFOLIO: PART 2
Build a Home Page (Text, Tables, Images, Color)
At the end of this lesson, participants will be able to:
-
Create a simple HTML page using Mozilla Composer
-
Format Text
-
Add and Edit a Table
-
Enter a Page Background and add an image

This set of instructions follows from:
If you haven't downloaded and installed Mozilla yet, please do so now. Realize, however, that this is an entire suite that contains a Web-browser, an e-mail and newsgroup client, and a chat client, as well as an HTML editing program called "Composer."
The only thing we are interested in here is Composer.
1. Open ![]() Mozilla and then open Composer.
Mozilla and then open Composer.
Click on (toolbar) File --> New --> Composer Page
or, click on the Composer Iconat the bottom left of the browser window.
You should see a WYSIWYG (What You See Is What You Get) Editor with a toolbar that should appear familiar to anyone who has used a Word Processing program.
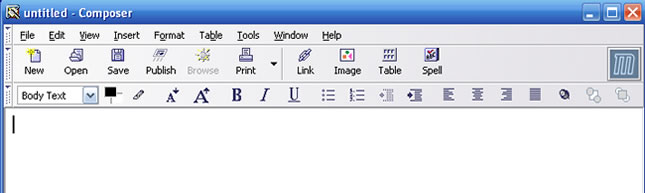
It should be fairly obvious what icons to click on to make a hyperlink, add an image, add a table, do spell check, make text bold, align text, add buttons, etc.
For now, let's save our blank page.
2. Save the Page
(Toolbar) File --> Save As
In the Page Title input box, enter " Your Name's Portfolio Home"
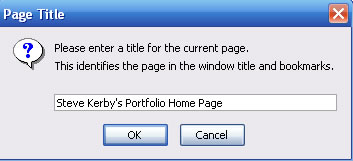
Click OK.
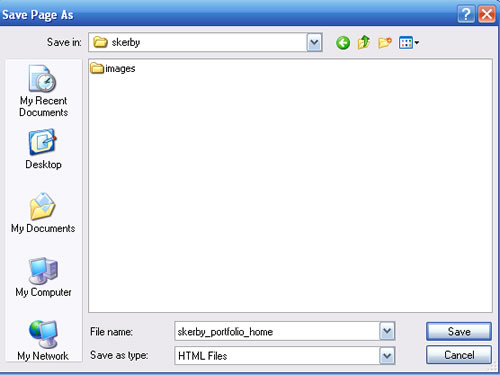
Navigate to the folder you built on your computer.
In the Save Page As dialogue box, enter (all in lowercase and with no spaces)
yourusername_portfolio_home.htm
Composer will automatically add the .html extension.
Note 1: When we give the page a "Title," it is fine to use spaces, apostrophes and upper case. When, however, we name the actual file (and this is what will become part of the URL), we must stick with lower case and no spaces. Mozilla Composer is a little confusing in this regard.
Note 2: We are using some redundancy in naming in this particular class because we do not want students to accidentally overwrite another student's work. For instance, we would not want 10 files called portfolio_home.html in various subdirectories within the same OTL502 directory. Too easy for one file to overwrite another.
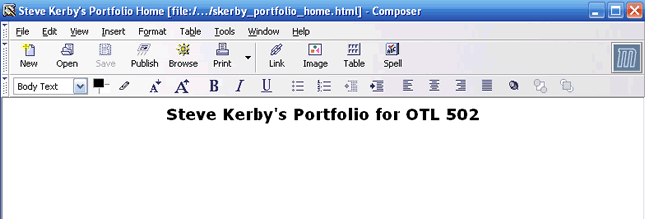
3. Add Text and make it a Title
Enter "YourName's Portfolio for OTL 502"
HIghlight the text and click on (Toolbar) Format --> Font --> Verdana
Click on the arrow next to "Body Text" on the toolbar and select Heading 3
Highlight the text and click on the Align Center icon on the toolbar.
4. Add a Table
With your cursor below your title, Click on (Toolbar) Insert --> Table
In Rows, enter 2; In columns, enter 4; in Width enter 770 pixels
Click pixels (NOT percentage)
In Border enter 0
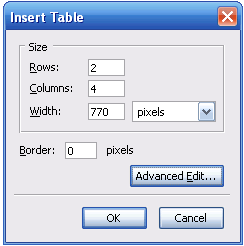
Click OK.
Note: In the editing window, we will see the red dots outlining the table boundaries. In browser mode, however, the table boundaries will be invisible.
Save Your Work
5. Get a Background Image
We want to get a background image to add to our images directory. So, click on this link to open a page with a Background (This should open a new window)
Right click anywhere on the page and select "Save Background Image As"
Note: In some browsers, you may need to select "view image" Then, on the page with the image, select "save image as"
Navigate to your images subfolder in your portfolio folder and save the image "border4.gif" in the images directory.
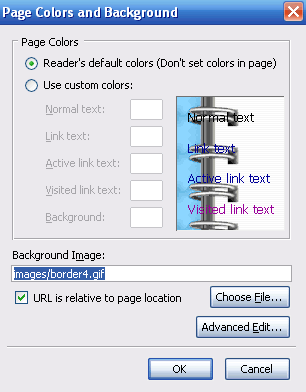
6. Add a Background Image to the Home Page
Click on (Toolbar) Format --> Page Colors and Background
In the Page Colors and Background box, click on the Choose File button just below the Backgournd Image input box.
Navigate to your images directory and select border4. Click on Open
Click on Ok
7. Edit Table Settings: Column Width
Click in the left column of the table (which should be outlined in red dots)
Either double-click or right click to get the Tables Properties Box
On the arrow under the Selection click on Column
Under Size, select the Width checkbox and enter 50 pixels
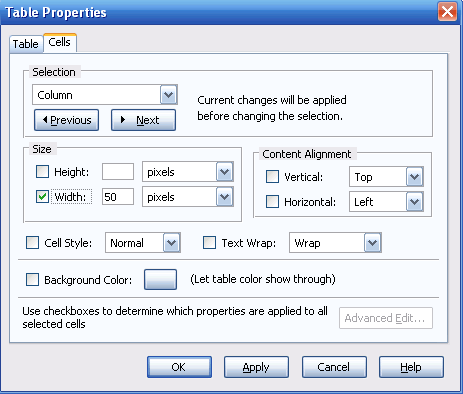
Note: The reason for doing this is to keep the contents of the table from covering up the image of the spiral notebook. We will keep the left column blank.
Save Your Work
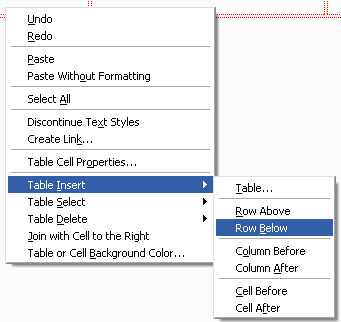
8. Edit Table Settings: Number of Rows
Click in the bottom row of table. Right click to get the selection box
Select Table Insert -->Row Below
Do the Table Insert --> Row Below action three more times until there are a total of six rows in the table.
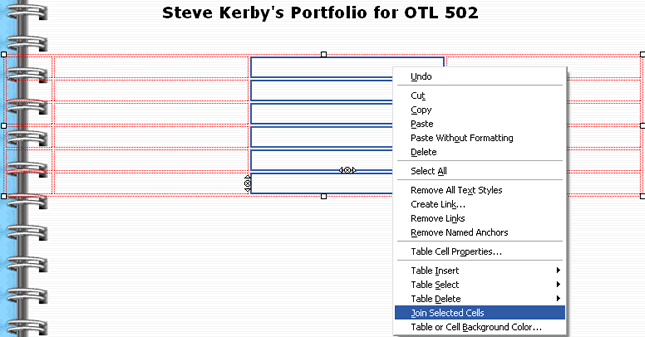
9. Edit Table Settings: Merge Cells
In the column second from right (third from left): highlight each of the cells in that particular column, then Right Click and select Join Selected Cells
10. Edit Table Settings: Add Color
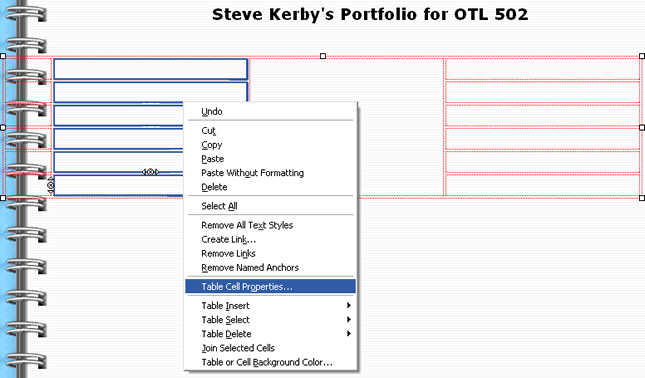
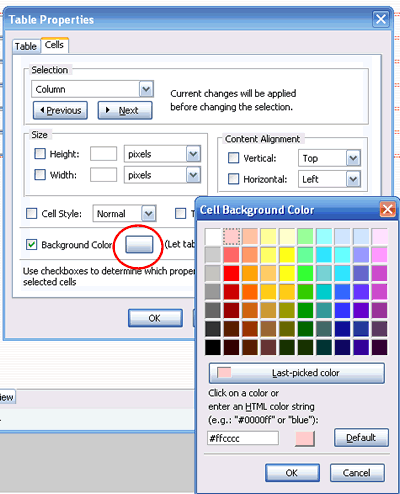
In the column second from left (third from right), use your cursor to highlight all the cells in the column, then Right Click and select Table Cell Properties
In the Table Properties Dialogue box, click on the button next to Background Color, and in the Cell Background Color box, select the top color in the second column (#ffcccc).
Click OK, Apply, and OK
11. Edit Table: Add and Format Text
In the column with the color, add the following the cells
- Benchmark Critique
- Learning Activity #1
- Learning Activity #2
- Learning Activity #3
- Discussion Forum Selections
- Development Notes
Change Font: Highlight the text, click on (Toolbar) Format --> Font --> Verdana
Change Size: Highlight the text, click on (Toolbar) Format --> Size --> Small
Save Your Work
12. Edit Table Settings: Column Width
You probably noticed the table columns growing. Let's fix that.
- Click in the column with the text and the color.
- Either double-click or right click to get the Tables Properties Box
- On the arrow under the Selection click on Column
- Under Size, select the Width checkbox and enter 200 pixels
13. Edit Table Settings: Merge Cells (Again)
You can see how tables can be used for basic layout. We already merged the cells in the second column from the right. Let's merge the cells in the far right column.
In the far right column, highlight each of the cells, then Right Click and select Join Selected Cells
14. Edit Table Settings: Add Color (Again)
We already changed the background color in the second from left column. Let's change the background color in the two right columns.
Use your cursor to highlight the two right columns then Right Click and select Table Cell Properties
In the Table Properties Dialogue box, click on the button next to Background Color, and in the Cell Background Color box, select the blue color in the next to bottom row and the third from right column (#000099)
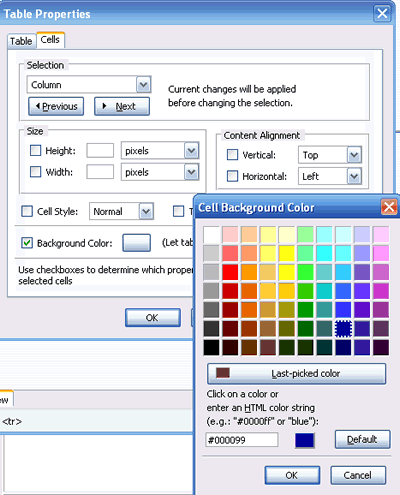
Click OK, Apply, and OK
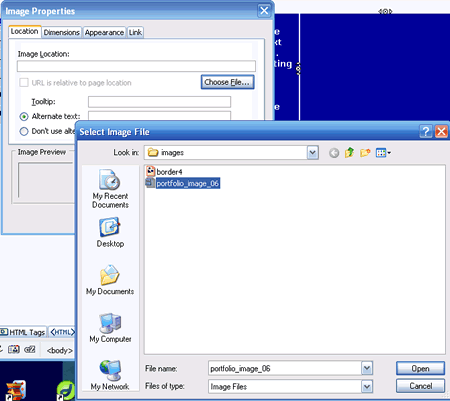
15. Add Image to Folder
Before you can add an image to the page, you need to put it in your images directory in your portfolio folder.
Right click on the image below, select Save Image As and navigate to the images folder in your portfolio and save it there.
Save Your Work

16. Edit Table Settings: Column Width (Again)
Before we add an image, let's fix the column width to match the image. The image is 250 pixels wide, so let's make the far right column that width.
- Click in right column.
- Either double-click or right click to get the Tables Properties Box
- On the arrow under the Selection click on Column
- Under Size, select the Width checkbox and enter 250 pixels
17. Add Image to Page
Put your cursor in the far right column Click on the Image Icon on the Toolbar
Click on the Choose File Button under the Image Location input box Select portfolio_image_06 Click on Open.
In the Alternate text box, enter "image of folder for portfolio"
Click Ok.
18. Add and Format Text
Enter some filler text in the central vacant column. Since the default color is black, it will be barely readable against the dark blue background.
Highlight the text (Toolbar) Format --> Text Color and select White (#ffffff)
Highlight the text (Toolbar) Format --> Font --> Verdana
Highlight the text (Toolbar) Format --> Size --> Small
Highlight the text and click on the Align Center icon on the Toolbar.
Highlight the text and click on the Bold icon on the Toolbar.
Save Your Work
What you now have should look something like this...
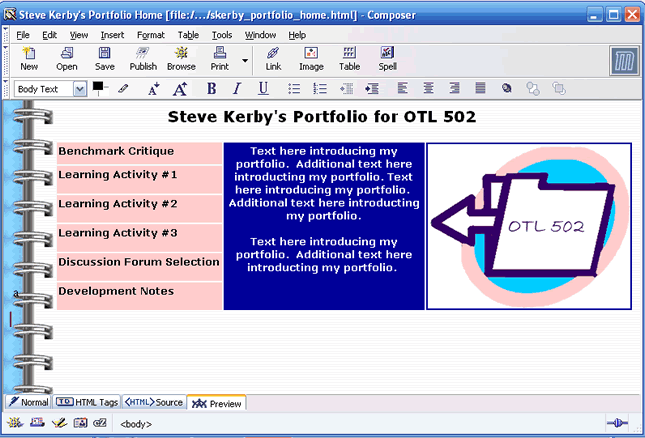
Ok. This is far from perfect, of course. And hardly finished. Next lesson we will add links. The lesson after that, we will publish.
Also, you may hate the colors. Dislike the image. Disagree with the layout. But at the very least, you should know enough now about the tools in Composer to layout another, perhaps better, page.
It should also be noted that this page may have a problem with 508 compliance. Do you know what it is?
That's it for this How To.
The Series continues with How to Create an Online Portfolio Part 3: Create Additional Pages and Hyperlinks
![]()