
"HOW TO..."
PhotoFiltre Basics Part 1: Make a Screen Shot
At the end of this lesson, participants will be able to:
-
make a screen shot
-
crop and resize an image
-
save as a jpg or gif
-
be able to use the basic features of PhotoFiltre
Note: PhotoFiltre truly is an amazing piece of freeware. It offers absolutely everything the beginner would want in a graphics program (as well as what most intermediate and some advanced users would want).
Before we do anything else, however, let's spend just a few minutes examining the toolbars.
The SIDE Toolbar (or "Tools Palette")
The point here is to realize that the icons and tools are context sensitive; that is, when you click on a particular icon, look down at the bottom of the tools palette--you will see how different features (appropriate to the tool selected) appear.
We'll just mention five features here. You can experiment with the others, or search the Web for PhotoFiltre tutorials and get additional information.
Select Tool Go back to this tool to click on an object or select an image. Also click here first before you make a selection to crop. The shapes at the bottom only appear when the select tool is selected |
Color Pick
PhotoFiltre calls this a Pippette, but most other programs call it a color pick. Try this. Open an image, click on the color pick, move it to the image and click. See what happened? It ""picked" the color of the image. Use this tool to match colors, as well as to change colors. You can also color pick from the color swatch at the top of the tool |
Fill Bucket
Once you have picked a color, you can then use the bucket to fill another image (or a portion of the same image) with that color. This works best with simple GIFS at 256 colors, or for filling backgrounds. |
Line Drawing For simple line drawings. Notice when you click on the line icon, you get additional features at the bottom of the toolbar for the size (and even opacity) of the line. |
Rubber Stamp OK. Photofiltre calls it a clone tool. This tool allows you to capture once section of an image and "clone" it to another section. You can have a lot of fun with this tool, blending a photo of yourself in with a photo of other people, for instance. |
 |
 |
 |
 |
 |
The TOP Toolbars
What you can't accomplish by clicking on the side toolbar, you can likely accomplish by clicking on one of the top toolbars.

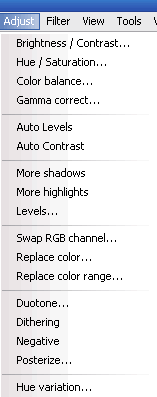
Don't miss the series of drop down menus. In some cases, these are duplicative. In other cases, the tools here are the only way you can accomplish something. For instance, the Adjust drop down menu below:
 |
The best way to learn these different tools is to just play and experiment.
Most of you will not likely be interested in adjusting color, hue, brightness, etc. But you can with the various tools.
Probably one feature that might use and not discussed below is the TEXT feature. To add Text to an image, for instance, click on the T in the Top Toolbar.
Okay. Now to the tutorial. |
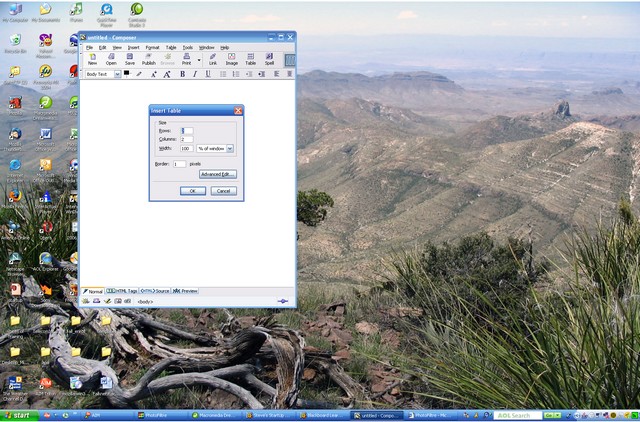
1. Find Something on Your Computer to Capture
If you don't have anything in mind, open Mozilla Composer.
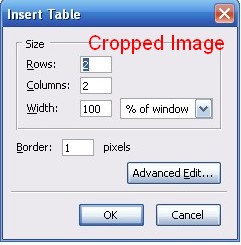
- Click on Insert --> Table.
- You will see the Insert Table Box
- Hit the Print Screen key on your keyboard.
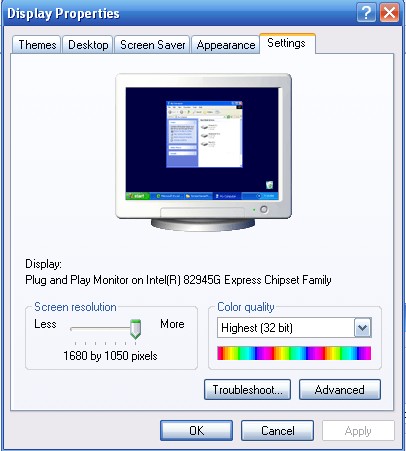
2. Determine Your Computer's Screen Resolution
If you do not know your computer's screen resolution, go to your desktop and
- right click -->Properties
- click on the Settings Tab
I have a wide screen monitor, so my screen setting is an unusually high 1680 by 1050. More typical resolutions are 1024 x 768, or 1280 x 1024. Some even still use 800 by 600.
At any rate, note your settings.
3. Open PhotoFiltre and Import Screen Shot
Open PhotoFiltre.
Click on File --> New
At the bottom, click on the arrow under the Preset size: and select the resolution closest to yours. Click OK.
Click on (Toolbar) Edit --> Paste (or hit Control + v)
Your screen should appear. Mine looks like this:
4. Save Your Image
This is important in PhotoFiltre. You will not be able to select a portion of the image to crop unless the image is saved.
- (Toolbar) File --> Save As.
- Click the arrow next to the Save as Type box and select JPEG
- Give the file a name (screen_01)
- accept the standard default for quality
5. Zoom to 100%
Click on the Zoom icon on the toolbar and select 100%

If you can't see the table box, then move the scroll bars until you can
6. Crop Your Image
Click on the Select Icon on the side toolbar and draw a box around the Insert Table dialogue box
Click on (Top Toolbar) Image --> Crop
And there it is.
7. Resize Your Image
Let's assume you need this to be smaller
Click on (Top toolbar) Image --> Image Size
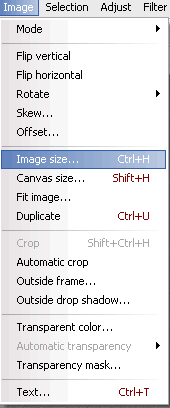 |
By the way, note the several other features of this drop down menu. Especially helpful can be the flip vertical and the flip horizontal. You may also occasionally need to use the rotate feature. The best way to learn these additional features is to just experiment and play. |
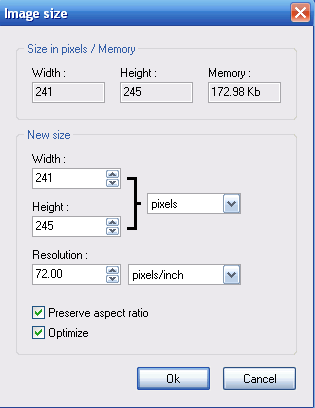
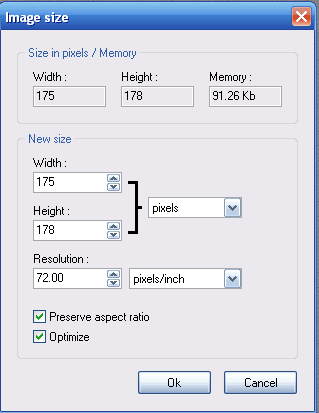
When Image Size is clicked, I get the following dialog box.
In order to change the image size, I just reduce the number of pixels in either the width or the height display.
If, for instance, I know I want it to be 175 pixels wide, I enter 175 in the width window, and as long as the "Preserve Aspect Ratio" box is clicked, the height will be changed accordingly.
Click OK
The 175 x 178 image that is the result:
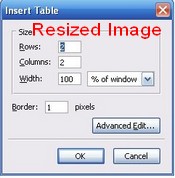
Save it where you can find it, and when you are writing instructions, you can then insert the image on the page at the appropriate spot.
~ ~ ~ ~ ~
Note 1: You can make an image smaller, but in most cases (especially when working with compressed images such as jpgs), you can't really make them larger--at least not without significant loss in quality.
So the best strategy when starting out with image editing is to begin with the largest size possible, and edit down.
Note 2: You can use the same "print screen strategy" outlined above for capturing and making an image of anything that you can get to show up on your computer screen. This is, of course, extremely helpful in writing tutorials of a certain type.
Obviously, the entire set of HOW TO's in OTL 502 is composed of screen shots such as done above.