Figure 1B-A
Figure
1B-B
Figure
1B-C
Figure
1B-D

Figure
1B-E
Figure
1B-F
Figure
1B-G
Figure
1B-H
Figure
1B-I
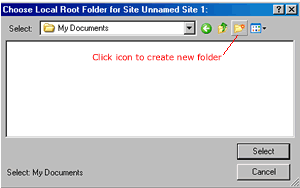
Figure 1B-J
Figure
1B-K
Figure
1B-L
| TO CREATE A SITE |
If you are creating a site from a template, follow instructions in the blue box.
If you are creating a site from scratch (NOT using template),follow instructions in the gray box.
|
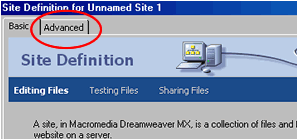
IF YOU ARE CREATING A SITE FROM A TEMPLATE: 1. Click on (Toolbar) Site --> New Site 2. On your Site Definite Box, Click on ADVANCED (Figure 1B-A)
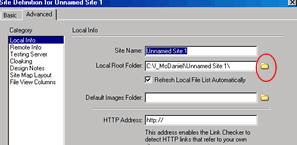
3.. Select your Template Folder by clicking on the yellow folder next to LOCAL ROOT FOLDER (Figure 1B-B)
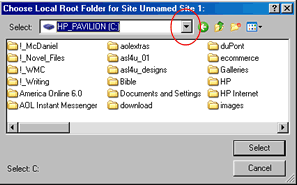
4. In the Choose Local Root Folder Box: click on the arrow and navigate to your template folder (Figure 1B-C)
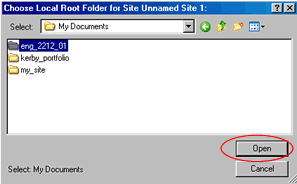
5. Highlight your template folder and click on Open (Figure 1B-D)
6. With the template folder in the select window, click on Select (Figure 1B-E)
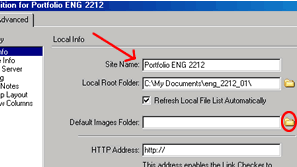
7. Type name of your site in the Site Name box (e.g. "Portfolio: ENG 2212" ) Figure 1B-F
8. Add a Default Images Folder by clicking on the Yellow Folder to the right of the Default Images Folder box and navigating to the images folder in your template folder (Figure 1B-F)
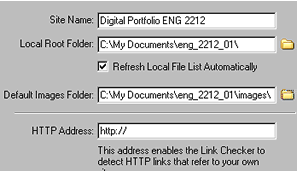
The result should look similar to Figure 1B-G
9. Select OK 10. Select Yes to "Enable Cache" (it makes DW work faster) |
|
IF YOU ARE CREATING A SITE FROM SCRATCH (You are NOT starting from a Template) 1. Click on (Toolbar) Site --> New Site 2. On your Site Definite Box, Click on ADVANCED (Figure 1B-H)
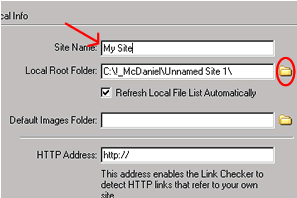
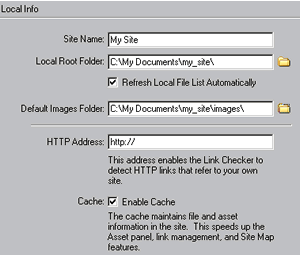
3. Type name of site in the Site Name box (e.g. "My Site" ) Figure 1B-I 4. Click on the yellow folder to the right of the Local Root Folder (Figure 1B-I )
5. Use the dialog box arrows to Navigate where you want to create a new folder (e.g. My Documents on C:)
6. Click on Create New Folder Icon (see Figure 1B-J)
7. Type in a folder name (e.g. my_site) 8. Highlight the new folder name and click on Select 9. To Add a Default Images Folder, Click on the Yellow Folder to the right of the Default Images Folder box. The Choose Local Image Folder dialog panel should automatically open to the new site you have just created.
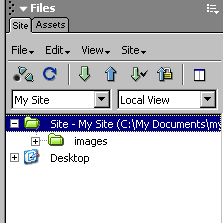
The result should look similar to Figure 1B-K 10. Select OK 11. Select Yes to "Enable Cache" (it makes DW work faster) Your site window on the right panel should look similar to Figure 1B-L |
You will notice that we are operating in "Local View." In Step Four, we will add remote information, so that Dreamweaver can publish your pages to the WWW.